
En este tutorial vamos a utilizar un teclado externo a nuestra pantalla para elaborar un programa capaz de realizar una acción en el momento que introduzcamos una contraseña de 4 dígitos y el programa verifique que es correcta.
Para ello reutilizaremos el código que hemos desarrollado en el anterior tutorial y añadiremos la parte de código que nos falta para descubrir la contraseña.
Para empezar, vamos a determinar cuales serán las funciones que se deberán gestionar para nuestro programa.
- El teclado leerá un dígito y veríficará si es el primer número de nuestra contraseña.
- Si el dígito es correcto, desaparecerá el número de la pantalla y esperaremos al siguiente dígito.
- No se podrán repetir números.
- Si nos equivocamos, aparecerán de nuevo todos los números y tendremos que comenzar desde el principio.
- Si hemos conseguido desbloquear el código, entonces se ejecutará la acción que queramos, como encender un motor, un LED o simplemente un mensaje de color verde que ponga UNLOCKED.
Empecemos…
Para comenzar a crear nuestro juego de contraseñas secreta, vamos a empezar a definir cómo modelar el formato para identificar cuando se escribe un dígito y se compara con nuestra contraseña real.
En este caso vamos a crear un programa auxiliar para introducir digitos desde el monitor serie para establecer como será la manera en la que revisaremos que acertamos cada dígito de la contraseña y desarrollar los eventos en la consecución correcta.
String pass = "2019";
char str_array[4];
int counter = 0;

void setup() {
  Serial.begin(9600);
}

void loop() {
  if ( Serial.available() ){
    char digit = Serial.read();

    if ( digit  == pass[counter] ){
      counter++;
      Serial.print("Digit ");Serial.print(digit);Serial.print(" in position ");Serial.print( counter );Serial.println( " is correct!!" );
    }else{
      counter = 0;
      Serial.print("Digit ");Serial.print(digit);
      Serial.println(" Failed. Try again");
    }

    if (counter == 4 ){
      Serial.println("Pass Unlocked");
    }
  }
}
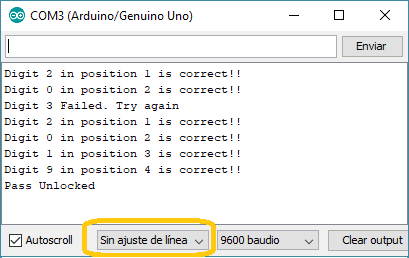
Y el resultado que podremos comprobar es el siguiente a través de nuestro monitor serie.
KEYPAD
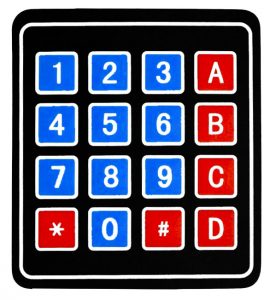
Para empezar, deberemos conectar correctamente nuestro teclado a nuestra placa que podra ser de 4×4 o de 4×3 filas y columnas.
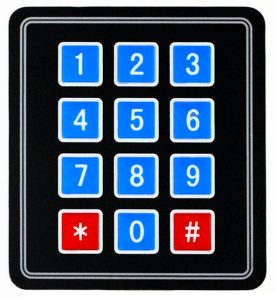
Esto puede ser un poco complicado ya que necesitamos 8 pines para conectar nuestro teclado, así que tendremos casi todos los pines ocupados, junto con la pantalla TFT.
Por ello vamos a realizar un truco para que nos quepa todo sin problemas.
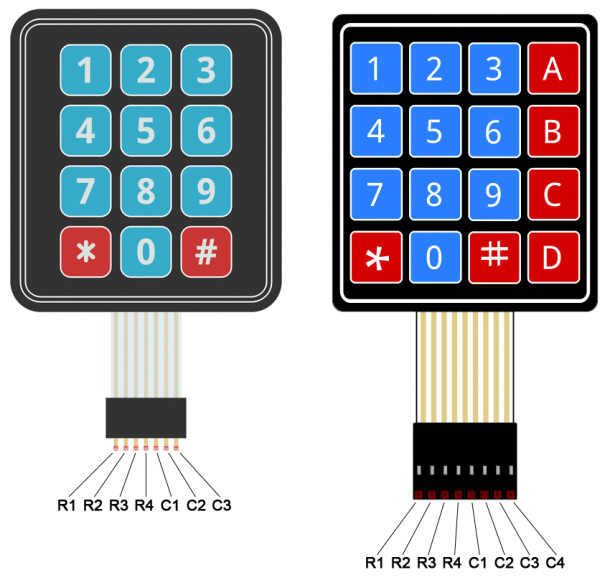
En esta pantalla, vamos a conectar nuestros pines de una manera especial. Las filas las conectaremos a 4 pines digitales y los 4 pines asociados a las columnas los conectaremos a pines analógicos. Puesto que son pines de salida, los pines analógicos también actuarán como si fueran digitales, de esta manera tendremos suficientes pines para todo.

En caso de conectar un teclado de 4×4, solamente tendriamos que añadir el 4 pin de las columnas en el mismo orden desde los pines analógicos. En el siguiente código explicamos la versión para conectar el teclado de 4 filas y 4 columnas.
#include "Keypad.h"

String pass = "2019";
char str_array[4];
int counter = 0;

const byte ROWS = 4; //four rows
const byte COLS = 4; //three columns

char keys[ROWS][COLS] = {
  {'1','2','3','A'},
  {'4','5','6','B'},
  {'7','8','9','C'},
  {'*','0','#','D'}
};

byte rowPins[ROWS] = {3,4,5,6}; //connect to the row pinouts of the keypad
byte colPins[COLS] = {A3, A2, A1, A0};

Keypad keypad = Keypad( makeKeymap(keys), rowPins, colPins, ROWS, COLS );

void setup() {
  Serial.begin(9600);
  Serial.println("Keypad Panel");

}

void loop() {
  char key = keypad.getKey();

  if (key) {
      //Serial.println(key);
      if ( key  == pass[counter] ){
        counter++;
        Serial.print("Digit ");Serial.print(key);Serial.print(" in position ");Serial.print( counter );Serial.println( " is correct!!" );
      }else{
        counter = 0;
        Serial.print("Digit ");Serial.print(key);
        Serial.println(" Failed. Try again");
      }

      if (counter == 4 ){
        Serial.println("Pass Unlocked");
      }

  }

}
Keypad Event
Vamos a aprovechar una capacidad que tienen estos módulos de teclado para atender a una programación por eventos.
Este modo de programación por eventos nos permite reconocer si hemos presionado, mantenido presionado o dejado de presionar los botones.
#include "Keypad.h"

String pass = "2019";
char str_array[4];
int counter = 0;

const byte ROWS = 4; //four rows
const byte COLS = 4; //three columns

char keys[ROWS][COLS] = {
  {'1','2','3','A'},
  {'4','5','6','B'},
  {'7','8','9','C'},
  {'*','0','#','D'}
};

byte rowPins[ROWS] = {4,5,6,7}; //connect to the row pinouts of the keypad
byte colPins[COLS] = {A3, A2, A1, A0};

Keypad keypad = Keypad( makeKeymap(keys), rowPins, colPins, ROWS, COLS );

void setup() {
  Serial.begin(9600);
  Serial.println("Keypad Panel");
  keypad.addEventListener(keypadPressed);
}

void loop() {

  keypad.getKey();


}

void keypadPressed(KeypadEvent key) {

    if( keypad.getState( ) == PRESSED ){

      if ( key  == pass[counter] ){
        counter++;
        Serial.print("Digit ");Serial.print(key);Serial.print(" in position ");Serial.print( counter );Serial.println( " is correct!!" );
      }else{
        counter = 0;
        Serial.print("Digit ");Serial.print(key);
        Serial.println(" Failed. Try again");
      }

      if (counter == 4 ){
        Serial.println("Pass Unlocked");
      }

    }

    if( keypad.getState( ) == RELEASED ){

      Serial.println("Button Released");
    }
}
Keypad + TFT Screen
Llegados a este punto, ahora es cuando procederemos a capturar estos eventos asociándoselos a la botonera de nuestra pantalla.
Hay que tener especial cuidado a la hora de asociar un número del vector de botones de la pantalla en función de los números del teclado, ya que el teclado proporciona un número cómo si fuera un carácter, por lo que la siguiente función sería erronea.
btn_list[ key ].clear( tft, WHITE);
Si obtenemos en la variable key el número 7, al obtenerse de un carácter, realmente estaríamos introduciendo el número 55 según la tabla ASCII. Y al no tener 55 elementos en el vector de botones, esto produce un error de acceso a memoria. La forma correcta sería utilizar una conversión de carácter a número o simplemente con la siguiente función.
btn_list[ key -‘0’].clear( tft, WHITE);
Finalmente nuestro programa quedaría de la siguiente manera.
#include <SPI.h>
#include "Keypad.h"
#define BLACK 0x0000
#define BLUE 0x001F
#define RED 0xF800
#define GREEN 0x07E0
#define CYAN 0x07FF
#define MAGENTA 0xF81F
#define YELLOW 0xFFE0
#define ROSE 0xF81F
#define WHITE 0xFFFF
#include "Adafruit_GFX.h"
#include "Adafruit_ILI9341.h"
#define TFT_DC 8
#define TFT_CS 9
Adafruit_ILI9341 tft = Adafruit_ILI9341(TFT_CS, TFT_DC);
const byte ROWS = 4; //four rows
const byte COLS = 4; //three columns
char keys[ROWS][COLS] = {
{'1','2','3','A'},
{'4','5','6','B'},
{'7','8','9','C'},
{'*','0','#','D'}
};
byte rowPins[ROWS] = {4,5,6,7}; //connect to the row pinouts of the keypad
byte colPins[COLS] = {A3, A2, A1, A0};
Keypad keypad = Keypad( makeKeymap(keys), rowPins, colPins, ROWS, COLS );
class TXTButton: public Adafruit_GFX_Button{
public:
uint16_t _x, _y, _w, _h;
uint8_t _marginx, _marginy, _txtsize;
uint16_t _c, _c_txt, _c_border;
char* _msg;
String _str;
TXTButton::TXTButton(void):Adafruit_GFX_Button(),_marginx(10), _marginy(5), _c( 0xFFFF ), _c_txt( 0x0000 ), _c_border( 0xFFFF ), _txtsize( 4 ) {};
TXTButton( char* msg, uint16_t x, uint16_t y, uint16_t c = 0xFFFF , uint16_t txtc = 0x0000,uint16_t borderc = 0xFFFF, uint8_t textsize = 4, uint8_t mgx = 10, uint8_t mgy = 10 )
:Adafruit_GFX_Button( ),_str( msg ), _x( x ), _y( y ),_marginx(mgx), _marginy(mgy), _c( c ), _c_txt( txtc ), _c_border( borderc ), _txtsize( textsize ) {
_msg = msg;
}
TXTButton( String msg, uint16_t x, uint16_t y, uint16_t c = 0xFFFF , uint16_t txtc = 0x0000, uint16_t borderc = 0xFFFF, uint8_t textsize = 4, uint8_t mgx = 10, uint8_t mgy = 5 )
:Adafruit_GFX_Button( ),_str( msg ), _x( x ), _y( y ),_marginx(mgx), _marginy(mgy), _c( c ), _c_txt( txtc ), _c_border( borderc ), _txtsize( textsize ) {
}
void init (Adafruit_GFX& _tft ){
uint16_t msg_w = _str.length()*_txtsize*5+ (_str.length()-1)*_txtsize;
uint16_t msg_h = _txtsize*8;
//Tamanio real del boton
uint16_t btn_w = msg_w+2*_marginx;
uint16_t btn_h = msg_h+2*_marginy;
// Center of Button
uint16_t btn_x = _x ;
uint16_t btn_y = _y ;
char buf[ 10 ];
_str.toCharArray( buf, _str.length()+1 );
initButton( &_tft ,btn_x, btn_y, btn_w, btn_h, _c_border , _c, _c_txt, buf, _txtsize);
}
void setStr( char* msg ){
_str = msg;
};
void setStr( String str ){
_str = str;
};
void setTextSize( uint16_t size ){
_txtsize = size;
};
void setMarginSize( uint16_t mx,uint16_t my ){
_marginx =mx;
_marginy =my;
};
void setXY( uint16_t x,uint16_t y ){
setX(x);
setY(y);
};
void setX( uint16_t x ){
_x =x;
};
void setY( uint16_t y ){
_y =y;
};
void setColor( uint16_t c, uint16_t ctxt, uint16_t cBorder ){
setFillColor(c);
setTextColor( ctxt );
setBorderColor (cBorder);
};
void setTextColor( uint16_t c ){
_c_txt = c;
};
void setBorderColor( uint16_t c ){
_c_border = c;
};
void setFillColor( uint16_t c ){
_c = c;
};
void draw(bool inv = true){
drawButton(inv);
}
void clear(Adafruit_GFX& _tft, uint16_t c ){
setColor( c, c, c );
init ( _tft );
draw(true);
}
};
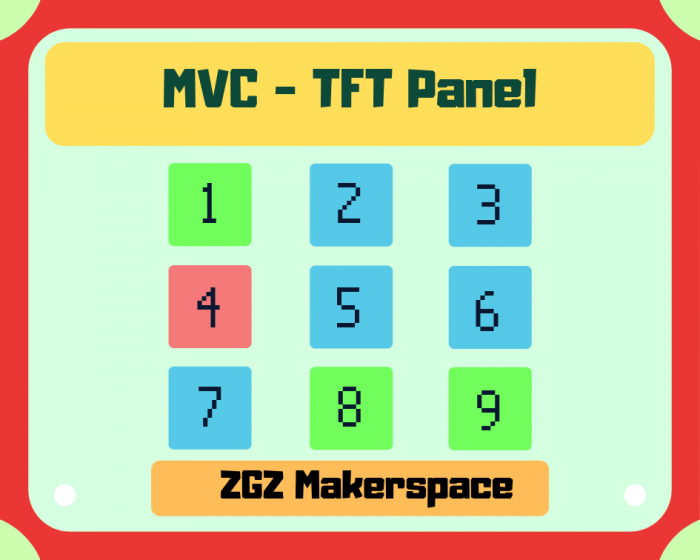
#define nrows 3
#define ncols 4
#define n nrows*ncols
TXTButton btn_list[n];
String pass = "2019";
char str_array[4];
int counter = 0;
void setup() {
Serial.begin(9600);
tft.begin(); // Begin ILI9341
tft.setRotation(3);
tft.fillScreen ( WHITE );
keypad.addEventListener(keypadPressed);
createPanel();
}
void loop() {
keypad.getKey();
}
void keypadPressed(KeypadEvent key) {
if( keypad.getState( ) == PRESSED ){
if ( key == pass[counter] ){
//btn_list[ key - '0' ].draw(false);
btn_list[ key - '0' ].clear( tft, WHITE);
counter++;
Serial.print("Digit ");Serial.print(key);Serial.print(" in position ");Serial.print( counter );Serial.println( " is correct!!" );
}else{
counter = 0;
Serial.print("Digit ");Serial.print(key);
Serial.println(" Failed. Try again");
createPanel();
}
if (counter == pass.length() ){
Serial.println("Pass Unlocked");
unlocked();
}
}
if( keypad.getState( ) == RELEASED ){
btn_list[ key - '0' ].clear( tft, WHITE);
}
}
void createPanel(){
int w = tft.width() ;
int h = tft.height() ;
int l = h/6;
int lx = w/(2*ncols);
int ly = h/(2*nrows);
String strlist[n] = { "0","1","2","3","4","5","6","7","8","9","10","11"};
//Grid of numbers in list
for(int i=0;i<n;i++){
int my = (2*(i/ncols)+1);
int mx = (2*(i%ncols)+1);
int row = my*ly;
int col = mx*lx;
btn_list[i].setXY(w/2-ncols*lx+col, h/2-nrows*ly+row);
btn_list[i].setStr( strlist[i] );
btn_list[i].setColor( BLACK, YELLOW, CYAN );
btn_list[i].init(tft);
btn_list[i].draw();
}
}
void unlocked(){
tft.fillScreen( CYAN );
int nr = 100;
for (int i=0; i < nr; i++ ){
tft.drawCircle (tft.width()/2, tft.height()/2, 200*i/nr, tft.color565( random(0,255), random(0,255), random(0,255) ) );
}
TXTButton unlock;
unlock.setXY ( tft.width()/2, tft.height()/2 );
unlock.setStr( "UNLOCKED" );
unlock.setTextSize( 5 );
unlock.setColor( tft.color565( random(0,255), random(0,255), random(0,255) ), YELLOW, tft.color565( random(0,255), random(0,255), random(0,255) ) );
unlock.init( tft );
unlock.draw();
delay(10000);
tft.fillScreen(WHITE);
createPanel();
}
Para aprender a realizar este mismo modelo de juego con una pantalla táctil y no dispones de teclado puedes aprender a como aplicar lo mismo en el siguiente enlace.
Para finalizar tu juego, puedes acceder desde el siguiente enlace.
Podéis acceder a nuestro repositorio Github, con cada una de los programas que mostramos en estos tutoriales
Para aprender más, podéis acceder a nuestro curso en el que disponéis de un conjunto de ejemplos para aprender cómo utilizar nuestras pantallas TFT.