
Una vez que ya hemos desarrollado el método para crear un botón en nuestras pantallas TFT en el anterior tutorial, procederemos a crear un conjunto de estos elementos para poder interaccionar con ellos.
En este sentido vamos a reutilizar nuestra anterior clase para poder crear una pequeña malla por filas y columnas y generar nuestros botones.
En este sentido queremos crear un modelo como si de una calculadora se tratara. Para ello, deberemos realizar los cálculos necesarios para disponer la posición de los botones correctamente en funcion del ancho y alto de nuestra pantalla como aparece en la imagen.
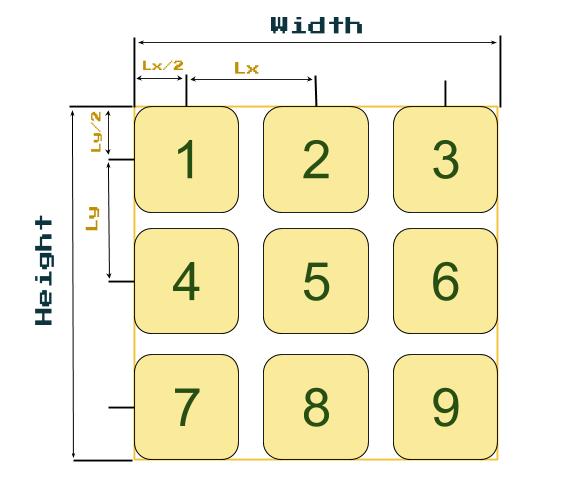
Si consideramos el ancho fijo de nuestra pantalla con una variable llamada Width y otra para la altura Height, podremos establecer una relacion de la posición de los botones en función del numero de filas nrows y columnas ncols.
Si al espaciado entre botón y botón lo llamamos lx y ly con la siguiente función matemática.
lx = width/ncols
ly = height/nrows
Podremos ver que el centrado desde el primer botón se encuentra a la mitad de estas variables de distancia. De esta manera podemos construir consecutivamente la malla en un bucle.
Aunque las soluciones son variadas, podemos aplicar las matemáticas para encontrar la posición en función del numero de la posición que le toca a cada botón.
#include <SPI.h>

#define BLACK   0x0000
#define BLUE    0x001F
#define RED     0xF800
#define GREEN   0x07E0
#define CYAN    0x07FF
#define MAGENTA 0xF81F
#define YELLOW  0xFFE0
#define ROSE  0xF81F
#define WHITE   0xFFFF

#include "Adafruit_GFX.h"
#include "Adafruit_ILI9341.h"

#define TFT_DC 8
#define TFT_CS 9

Adafruit_ILI9341 tft = Adafruit_ILI9341(TFT_CS, TFT_DC);

class TXTButton: public Adafruit_GFX_Button{
  public:
    uint16_t _x, _y, _w, _h;
    uint8_t _marginx, _marginy, _txtsize;
    uint16_t _c, _c_txt, _c_border;
    char* _msg;
    String _str;

    TXTButton::TXTButton(void):Adafruit_GFX_Button(),_marginx(10), _marginy(5), _c( 0xFFFF ), _c_txt( 0x0000 ), _c_border( 0xFFFF ), _txtsize( 4 ) {};

    TXTButton( char* msg, uint16_t x, uint16_t y, uint16_t c = 0xFFFF , uint16_t txtc = 0x0000,uint16_t borderc = 0xFFFF, uint8_t textsize = 4,  uint8_t mgx = 10, uint8_t mgy = 10  )
      :Adafruit_GFX_Button( ),_str( msg ), _x( x ), _y( y ),_marginx(mgx), _marginy(mgy), _c( c ), _c_txt( txtc ), _c_border( borderc ), _txtsize( textsize )  {
      _msg = msg;
    }

    TXTButton( String msg, uint16_t x, uint16_t y,  uint16_t c = 0xFFFF , uint16_t txtc = 0x0000, uint16_t borderc = 0xFFFF, uint8_t textsize = 4,  uint8_t mgx = 10, uint8_t mgy = 5  )
      :Adafruit_GFX_Button( ),_str( msg ), _x( x ), _y( y ),_marginx(mgx), _marginy(mgy), _c( c ), _c_txt( txtc ), _c_border( borderc ), _txtsize( textsize )  {

    }

    void init (Adafruit_GFX& _tft ){

      uint16_t msg_w = _str.length()*_txtsize*5+ (_str.length()-1)*_txtsize;
      uint16_t msg_h = _txtsize*8;

      //Tamanio real del boton
      uint16_t btn_w = msg_w+2*_marginx;
      uint16_t btn_h = msg_h+2*_marginy;
      // Center of Button

      uint16_t btn_x = _x ;
      uint16_t btn_y = _y ;

      char buf[ 10 ];
      _str.toCharArray( buf, _str.length()+1 );

      initButton( &_tft ,btn_x, btn_y, btn_w, btn_h, _c_border , _c, _c_txt, buf, _txtsize);
    }

    void setStr( char* msg ){
      _str = msg;
    };

    void setStr( String  str ){
      _str = str;
    };

    void setTextSize( uint16_t  size ){
      _txtsize = size;
    };

    void setMarginSize(  uint16_t  mx,uint16_t my ){
      _marginx =mx;
      _marginy =my;
    };

    void setXY( uint16_t  x,uint16_t y ){
      setX(x);
      setY(y);
    };

    void setX( uint16_t  x ){
      _x =x;
    };

    void setY( uint16_t  y ){
      _y =y;
    };

    void setColor( uint16_t  c, uint16_t ctxt, uint16_t cBorder ){
      setFillColor(c);
      setTextColor( ctxt );
      setBorderColor (cBorder);
    };

    void setTextColor( uint16_t  c ){
      _c_txt = c;
    };

    void setBorderColor( uint16_t  c ){
      _c_border = c;
    };
    void setFillColor( uint16_t  c ){
      _c = c;
    };

    void draw(bool inv = true){
      drawButton(inv);
    }

    void clear(Adafruit_GFX& _tft, uint16_t  c ){
      setColor( c, c, c );
      init ( _tft );
      drawButton(true);
    }
};

bool evt_change = true;

uint16_t w=320;
uint16_t h=240;

void setup() {
  Serial.begin(9600);
  tft.begin();  // Begin ILI9341
  tft.setRotation(3);
  tft.fillScreen ( WHITE );

  w = tft.width() ;
  h = tft.height() ;
  Serial.print("W: ");
  Serial.print(w );
  Serial.print("  H: ");
  Serial.println(h );Serial.println( );

  int nrows  = 4;
  int ncols  = 3;
  int n = nrows*ncols;

  TXTButton btn_list[n];
  int l = h/6;
  int lx = w/(2*ncols);
  int ly = h/(2*nrows);

  Serial.print("LX: ");
  Serial.print(lx );
  Serial.print("  LY: ");
  Serial.println(ly );Serial.println( );

  String strlist[n] = { "1","2","3","4","5","6","7","8","9","10","11","12"};

  //Grid of numbers in list
   for(int i=0;i<n;i++){
    int my = (2*(i/ncols)+1);
    int mx = (2*(i%ncols)+1);

    int row = my*ly;
    int col = mx*lx;

    btn_list[i].setXY(w/2-ncols*lx+col, h/2-nrows*ly+row);
    btn_list[i].setStr( strlist[i] );
    btn_list[i].setColor( BLACK, YELLOW, CYAN );
    btn_list[i].init(tft);
    btn_list[i].draw();
   }

}

void loop() {


}
Con este código, procederemos a la creación de un programa para ejecutar la apertura de un código mediante una combinación secreta. Serás capaz de programarlo tú mismo?.
En el siguiente tutorial te enseñamos cómo hacerlo con un teclado.
Podéis acceder a nuestro repositorio Github, con cada una de los programas que mostramos en estos tutoriales
Para aprender más, podéis acceder a nuestro curso en el que disponéis de un conjunto de ejemplos para aprender cómo utilizar nuestras pantallas TFT.